
Welcome to Scrappy Hour! I hope you like the fun but beautiful (and sometimes stunning IMO) project I have for you tonight. I'll be here for a little while but you know me, early to bed! I will however be around tomorrow to answer any questions you may have.
I'd like to show you how to make a lovely lace flower. I love to use flowers and love an old fashioned look and feel. Lace flowers are some of my favourites. I can't always afford a Prima - nor do I always have the perfect one "on hand". As you know, I adore fabric and all things textile so making these was a natural progression for me. To make these beauties, follow these easy steps:
Materials:
lace
wire
center object
1. pick your lace. Decide on your center look. As a general rule, I like to use lace that is about 1" in width. Depending on what you want to center in your lace however determines how wide your lace needs to be, the bigger the center (and the final dimension of the flower) the wider the lace. The smaller? The reverse is true.
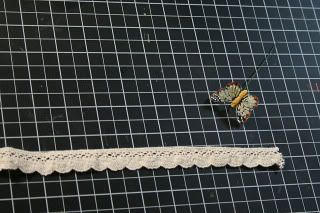
I also like if possible to use wire for this project (this project is also easily done with needle and thread instead of wire). Wire is just firmer and helps me with my spazzy (MS) hands to work easier! Here I've chosen a butterfly (I love using butterflies on my pages!) to work with. You can also use twist ties or other florist type wire. You won't see it when you're done. My lace is also smaller in the demonstration photos than I normall work with because I wanted some small flowers for my project. It's 3/4" wide.
How much lace? As a general rule of thumb, use double the length of the wire that you're going to use.
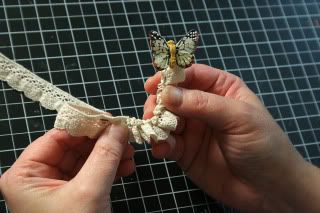
2. Starting at one end, thread your wire (or needle and thread) through every other (or so - this is not an exact science) loop in the top of one side of your lace. Do this until you have approximately double the length of lace compared to the length of wire - or until it looks good TO YOU. This project is all about what YOU like.

3. One thing I find helpful is to curl my wire as I go to make sure the gathers in the lace are the fullness I'm wanting to see. If it's not right, I can remove some or keep going. Again, this is a personal choice.
4. When you've reached about as far as you want to go and the gathered lace is as full as you'd like it to be, cut the remaining lace.
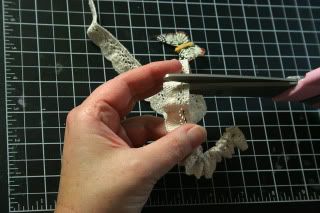
5. Now comes the "fun" part. Just take the loose end of the wire so the two ends are twisted together Et voila! Just press and crinkle and shape to your liking and you're done!

Now, I didn't end up liking that green butterfly on the size of lace I chose so replaced it with the antique button you see on the flower below. Each one of these beauties took me under 5 minutes to make (longer if you have to stop and take photos along the way ) and you'll be seeing them on layouts of mine in the near future.

I hope you've enjoyed our time together. Let me know if you have any questions! I look forward to seeing what you do with this project and seeing some lacey flowers on your layout or cards in the near future!
I'd like to show you how to make a lovely lace flower. I love to use flowers and love an old fashioned look and feel. Lace flowers are some of my favourites. I can't always afford a Prima - nor do I always have the perfect one "on hand". As you know, I adore fabric and all things textile so making these was a natural progression for me. To make these beauties, follow these easy steps:
Materials:
lace
wire
center object
1. pick your lace. Decide on your center look. As a general rule, I like to use lace that is about 1" in width. Depending on what you want to center in your lace however determines how wide your lace needs to be, the bigger the center (and the final dimension of the flower) the wider the lace. The smaller? The reverse is true.
I also like if possible to use wire for this project (this project is also easily done with needle and thread instead of wire). Wire is just firmer and helps me with my spazzy (MS) hands to work easier! Here I've chosen a butterfly (I love using butterflies on my pages!) to work with. You can also use twist ties or other florist type wire. You won't see it when you're done. My lace is also smaller in the demonstration photos than I normall work with because I wanted some small flowers for my project. It's 3/4" wide.
How much lace? As a general rule of thumb, use double the length of the wire that you're going to use.
2. Starting at one end, thread your wire (or needle and thread) through every other (or so - this is not an exact science) loop in the top of one side of your lace. Do this until you have approximately double the length of lace compared to the length of wire - or until it looks good TO YOU. This project is all about what YOU like.
3. One thing I find helpful is to curl my wire as I go to make sure the gathers in the lace are the fullness I'm wanting to see. If it's not right, I can remove some or keep going. Again, this is a personal choice.
4. When you've reached about as far as you want to go and the gathered lace is as full as you'd like it to be, cut the remaining lace.
5. Now comes the "fun" part. Just take the loose end of the wire so the two ends are twisted together Et voila! Just press and crinkle and shape to your liking and you're done!
Now, I didn't end up liking that green butterfly on the size of lace I chose so replaced it with the antique button you see on the flower below. Each one of these beauties took me under 5 minutes to make (longer if you have to stop and take photos along the way
) and you'll be seeing them on layouts of mine in the near future. I hope you've enjoyed our time together. Let me know if you have any questions! I look forward to seeing what you do with this project and seeing some lacey flowers on your layout or cards in the near future!


Nice! They'd make lovely hair pieces for young daughters and grandchildren too. :)
ReplyDeleteAwesome Kelly! Love these pretty flowers!
ReplyDelete